

How to create an API key for your directory
How to create an API key for your directory
An API key lets our install run against your directory without anyone logging in as you. You generate it yourself, and it never gives up your password.
It takes about two minutes, and it all happens in your directory admin.
The install form opened by itself right after you checked out. Leave that tab open and do the steps below in a second tab, so the form is still sitting there when you come back with the key.
Finish the permissions steps (5 to 8 below) before you press submit on the install form. Pasting the key into the form is fine at any point. Submitting is the part that waits.
Generate the key
Step 1. In your directory admin, go to Developer Hub, then Generate API Key.
Step 2. Click the Generate API Keys + button at the top right of that screen.
Step 3. Name the key DirectoryToolkit.
The name is only a label, but use that one. It is how the key is identified later if you or we ever need to look it up.
Step 4. Copy the key that appears.
The key is shown once. If you close the screen without copying it, you cannot get that key back and you will need to generate another one.
Park it somewhere safe now: paste it into the install form if you have that open, or into a note.
Do not press submit yet. A brand new key cannot do anything until you turn its permissions on, and that is steps 5 to 8 right below. Finish those, then submit the form.
Turn on the permissions
A brand new key can read almost nothing until you say what it is allowed to do. This is the part people miss.
Step 5. Go back to the API screen and refresh the page. The new key will not show its options until you do.
Step 6. Find your new key in the list, open its Actions menu, and choose Permissions.
Step 7. Open the Advanced Endpoints tab.
Step 8. Click All On at the top of the list, then click Save Permissions.
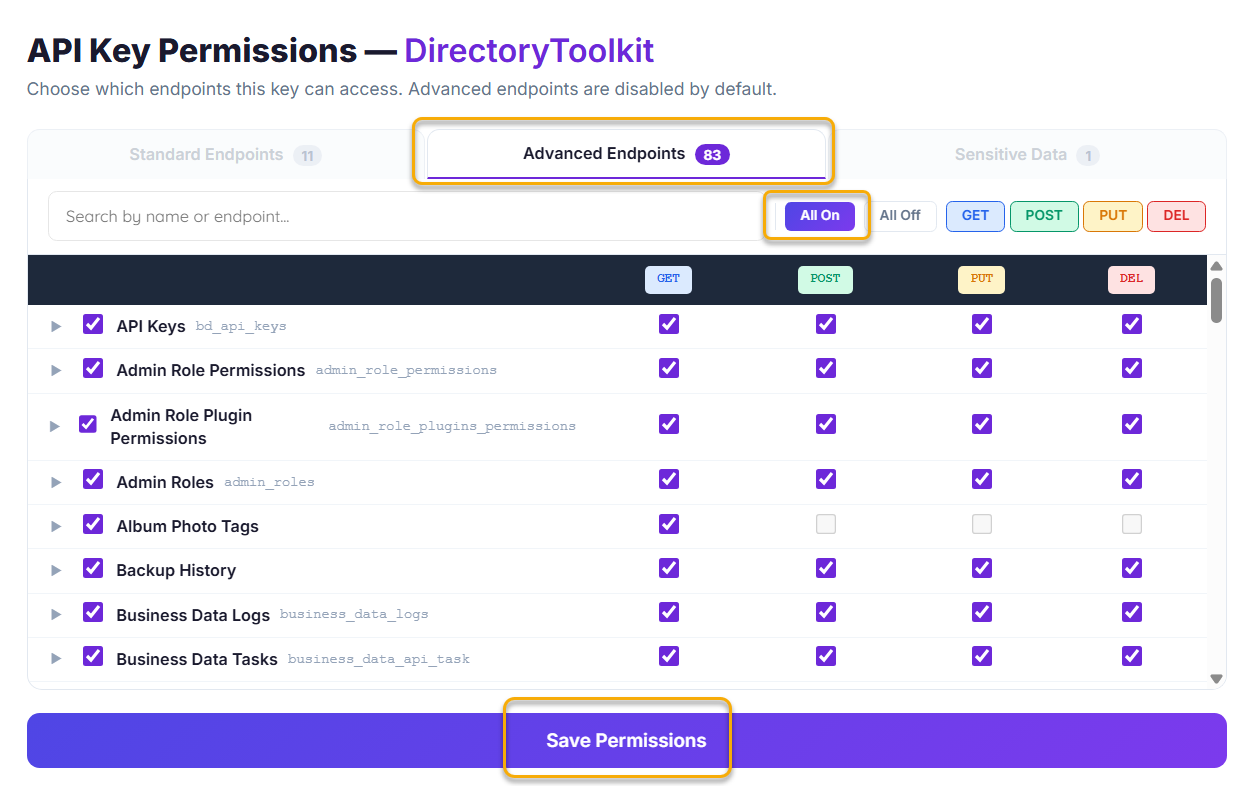
All On is the button at the top of that tab. There is no need to scroll the list and pick entries one at a time.
Now submit the install form
With the key copied and the permissions saved, switch back to the install form tab, put in your directory's web address and the key, and submit.
Closed that tab? Open it again here: Connect Your Directory.
We check the key against your site straight away. If something is wrong, nothing is saved and you can simply submit again.
What if I already submitted the form before turning the permissions on?
Nothing is broken, and you do not need a new key.
Go and do steps 5 to 8 on the key you already sent us, then submit the form again with the same web address and the same key. We re-check the key on every submission, so the second one simply replaces what the first one told us. There is no limit on how many times you can submit it.
You can reopen the form here: Connect Your Directory.
You will not have lost anything in between either. If the key was not usable yet when you first submitted, nothing was saved on our side at all, so there is no half-finished setup sitting there to untangle.
What if the key stops working?
Generate a new one using the steps above and send it to us. Keys cannot be repaired, only replaced, which is why you will not find the key on your own profile to edit.